2. User Guide
The R2D app, as will be discussed in Software Architecture, is a scientific workflow application that creates workflows and runs them in the background. These workflows can involve multiple different backend applications. Once the R2D app is started, the user is presented with the user interface shown in Fig. 2.6. It is in this UI where the user selects the applications to run in a workflow, inputs the necessary parameters for each of these applications, starts the workflow either locally or remotely, and finally views the simulation results. The main window of the UI is divided into several separate areas:
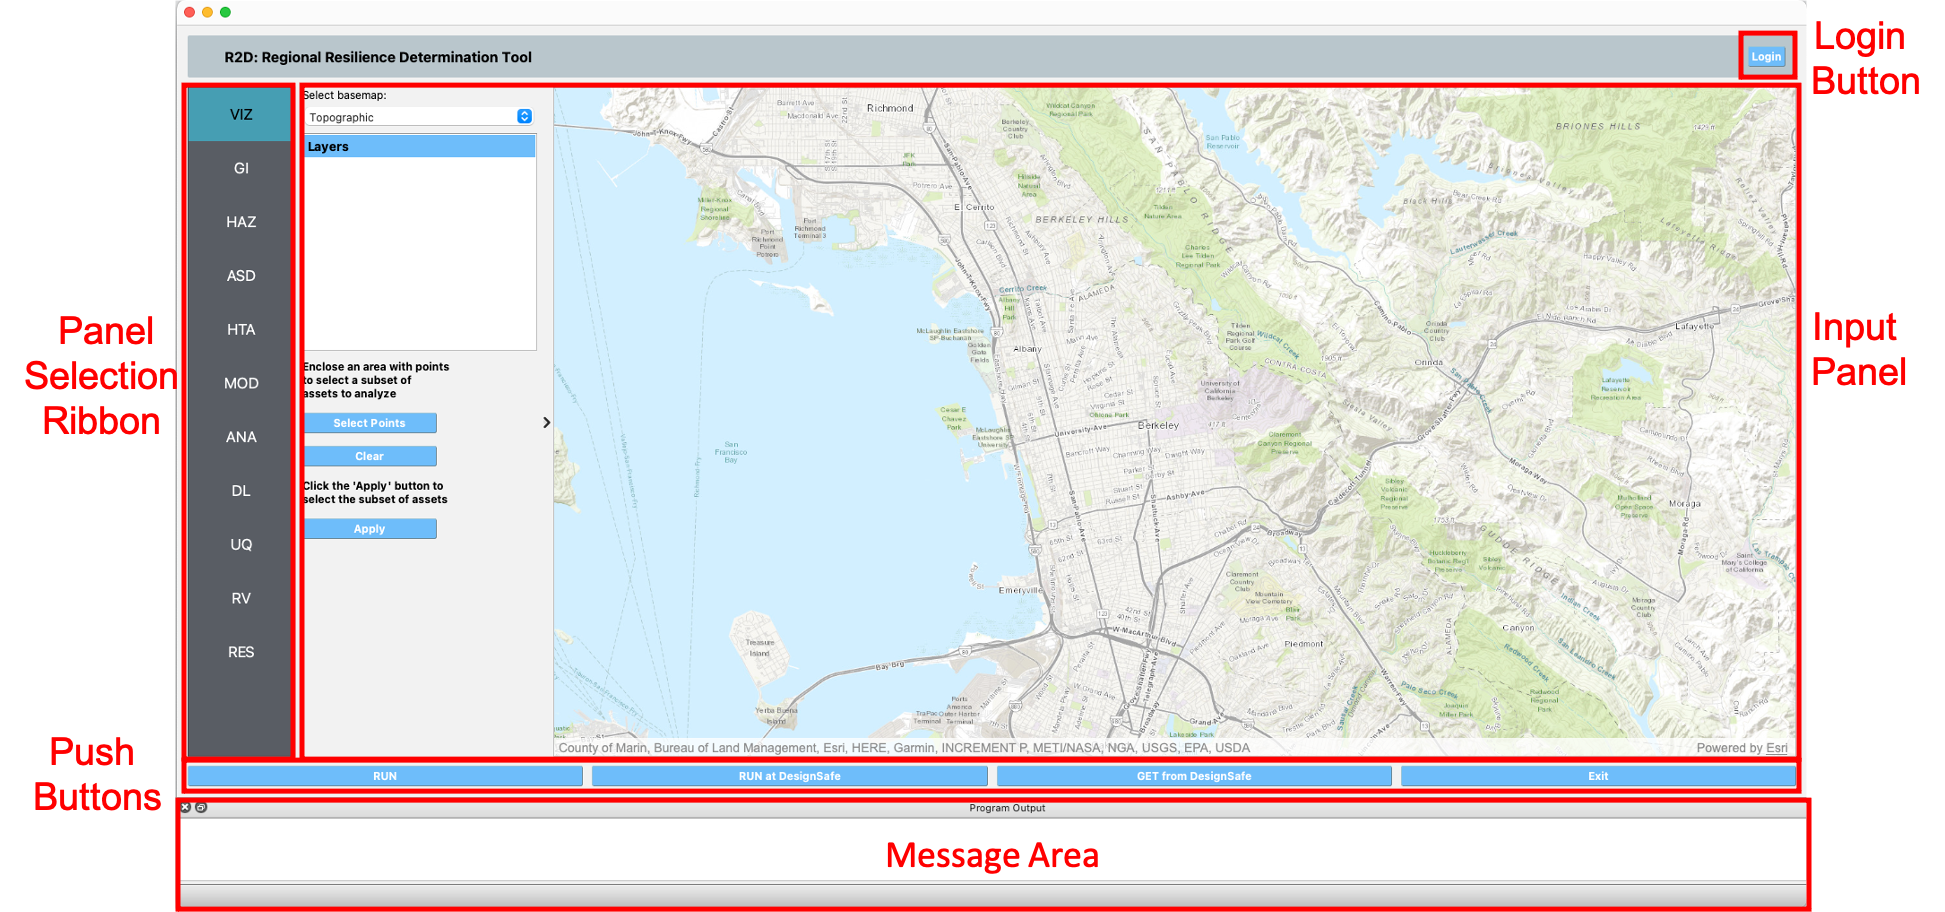
Fig. 2.6 The R2D app user interface.
Login Button:
The Login button is at the top right of the user interface. Before the user can launch any jobs on DesignSafe, they must first login to DesignSafe using their DesignSafe login and password. Pressing the login button will open up the login window for users to enter this information. Users can register for an account on the DesignSafe-CI website 1.
Input Panel:
The input panel is the large central area of the user-interface where the user provides input for the various applications, and also where they can view the results.
Input Panel Selection Ribbon:
The ribbon on the left side provides the user with a selection of buttons to choose from (e.g. RV: Random Variables, RES: Results). Selecting any of these buttons will change what is displayed in the central input panel. Each panel will present the user with an option for which application to choose for that part of the workflow, and will then allow a user to provide inputs for that application. In the following sections, each of the panels in the input panel selection ribbon are reviewed:
Push Buttons:
This is the area near the bottom of the UI in which 4 buttons are contained:
RUN: Run the simulation locally on the user’s desktop machine.
RUN at DesignSafe: Process the information, and send to DesignSafe. The simulation will be run there on a supercomputer, and results will be stored in the user’s DesignSafe jobs folder.
GET from DesignSafe: Obtain the list of jobs for the user from DesignSafe and select a job to download from that list.
Exit: Exit the application.
Clicking on the RUN at DesignSafe button will show the remote job submission dialog, given in Fig. 2.7.
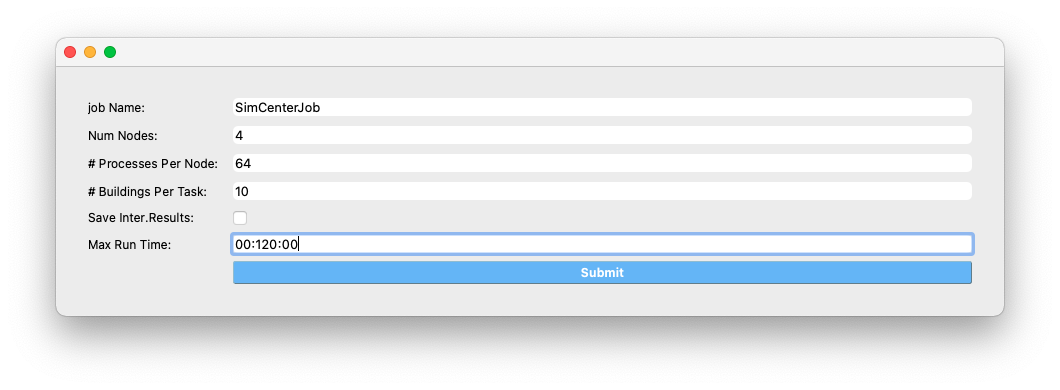
Fig. 2.7 Remote job submission dialog.
Descriptions and guidelines for each input are given below:
Job Name: An easy to remember and meaningful name to differentiate this job from others.
Number of Nodes: Number of compute nodes requested. Each node has many cores, and each core typically contains several processors/threads.
Note
If a large number of nodes are requested (e.g., more than 10), the job may stay longer in the queue before it starts.
Number of processors per Node: Number of processors that will be utilized on each node. Typically, it is advantageous to use all available processors of a node when the memory demand of a job is small. When a job is memory intensive, e.g., large finite element models, utilizing all available processors may overwhelm the memory cache of a core and the computation will slow down. Currently, the maximum number of processors is 48 and the minimum is 1.
Number of Buildings per Task: Number of buildings per task.
Note
Each task will run in parallel on its own processor. The number of tasks is equal to the number of nodes multiplied by the number of processors per node. Since it takes time to assign buildings to a task and spool up the computation, it may be advantageous to assign a batch of buildings to a task when the individual building analyses are expected to have a short runtime. A good approach is to estimate the total number of buildings to be analyzed and then select the Number of Nodes, Number of processors per Node, and Number of Buildings per Task so that the buildings can be strategically distributed across all processors. This is so that all processors are effectively utilized and do not sit idle.
Save Intermediate Results: Save intermediate results to a compressed folder. This is typically not recommended as this as this will use up disk space.
Max Run Time: The maximum time a job will run on the DesignSafe computer, in the format of Hours:Min:Sec. Job will stop if the run time exceeds this threshold.
Note
A user can check the status of a remote run by clicking on the GET from DesignSafe button. If the analysis status shows FAILED, users are encouraged to log into their DesignSafe account to view the detailed output of the run. To view the detailed output of a run go to the DesignSafe webpage and log in with your credentials. Next, click on the menus Workspace -> Tools & Applications -> Job Status and then select More info to view the status of a job.
Message Area:
The message area is located in the bottom of the UI and displays the status and error messages for a running background application. The message area is a dockable dialog which can be resized, moved, and closed as needed. The dialog visibility can be toggled by clicking on the menu item View -> Program Output. If moved from its default location, the status dialog can be restored to the bottom of the UI by dragging the dialog back to the bottom of the UI and hovering over the area.
- 1
For more help on external services provided by DesignSafe-CI, such as creating an account, we encourage users to explore their documentation or consider submitting a ticket.